
 With all of the fall and Winter Holidays approaching I thought I would be fun to show you How To Make Quick And Easy Homemade Parchment. It’s great for making Note Cards, Calendar Covers, Envelopes, or Journal Covers.
 To get started, all you need is some Wax Paper, Plastic Wrap, Three Sheets of Paper, Scissors or Decorative Edge Scissors and some Dried Flowers or Leaves.
 First, Tear off a piece of Wax Paper the size of the project you want to make also Tear off a piece of Plastic Wrap.
 Take your Wax Paper and crumple it up into a ball.
 Then Open the Wax Paper back up and smooth it out until it lies flat. The crinkles will give your paper a nice “Parchmenty” look.
 Next, Fold the piece of Wax Paper in half.
 Now take your Plastic Wrap and lay it on top of the Wax Paper starting at the fold keeping the Clingy Side Up. This should be the side that adheres best. (Please be aware that not all Plastic Wrap works as a good “glue”. Try a different kind if it doesn’t work at all. Most that I have tried will work, even if imperfectly.)
 Sprinkle some of your Dried Flowers or Leaves on top of the Plastic Wrap.
 Next, fold the Wax Paper over the Plastic Wrap to form a Parchment Sandwich.
 Then, go to your ironing board and put them Two pieces of Protective Paper on top of the ironing board cover and turn on your iron to a medium heat.
 Place Parchment Sandwich on top of the paper making sure that None of the Plastic Wrap touches the ironing board cover and
 Cover this with another piece of Paper to protect your iron from the Wax Paper and Plastic Wrap.
 Now you are ready to iron. Begin pressing your Parchment Sandwich, first on One Side and then the Other making sure that you cover all areas of the Parchment. The layers should stick together.
 You now have a piece of Homemade Parchment ready to finish the edges. One edge finish I like is a Torn Edge. The edges can also be Cut with regular Scissors or Decorative Edge Scissors. If you are going to use a Torn Edge, you need to Tear it Immediately after Pressing, so that it will tear more Easily.
 After you finish your edges the way you want them, press your Parchment again to make sure that it sticks together and stable.
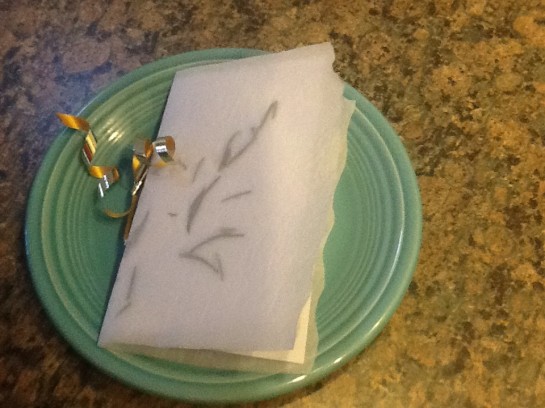
 I like to make Note Cards with my Parchment. To do so, you first need to fold your piece of Parchment in half.
 Now, take a piece of Pretty Paper or Wrapping Paper. Fold this in half , and cut a little smaller than your note card.
 Insert the paper into your Note Card and tack down with glue or you can bind it with ribbon or string, tying it on the outside.
 Tying Note Card Insert – 1
 Tying Note Card Insert – 2
 Tying Note Card Insert – 3
 You now have a Finished Parchment Note Card.
If you like to do Stamping, you can Stamp your Note Card fairly easily. However, they are difficult to write on.
You can use the same process to make an Envelope for your Note Card.
Homemade Parchment is also nice to use for Calendar Covers or Journal Covers. The only limit is your imagination.
Here is a brief video of the that I made of the process of Making Quick And Easy Homemade Parchment.
I hope that you enjoyed this tutorial. Have fun making your own Homemade Parchment and make sure you let me know what kind of projects you have used it for.

Wonderful tutorial! You make it look so easy Yael.
LikeLike
Thanks Donna,
It is really easy, and takes only about 5 minutes to do.
Yael
LikeLike
Ohh.. that’s what something I am looking for! It’s very easy to follow. Thank’s for sharing!
Likes your fb, hope you will love to follow my blog.
Warmest,
Cindy
http://hakenindie.blogspot.nl
LikeLike
Cindy,
Thanks. This is really easy to do and I love the results. It does not have the brownish color of some parchment, but does have the crinkly look.
Yael
LikeLike
Love this idea. I bet my boys would have fun with it too.
LikeLike
Lisa,
Thanks. Hope your boys enjoy doing it. It is a really easy project. Some plastic wrap is better than others at binding the wax paper together, though. I like the fact that the result is a fairly stiff paper.
Yael
LikeLike
Loved saving your tutorial and watching your video on the parchment paper-making. Thank you so much for sharing. I am now a follower of your blog and look forward to enjoying more of your wonderful presentations and tutorials. I invite you to join me as well on my blog at http://atastefultouch.blogspot.com
Hugs, Gayle.
LikeLike
Hi Gayle,
Thanks for visiting and for your comment and Follow. Glad you liked the tutorial. It is a fun project. I don’t get a lot of tutorials up, but hope to in the future.
Yael
LikeLike
Bear With Me…Great concept and instructions♫ Happy Week/weekend♥
LikeLike
Hi Laurie,
Thanks for stopping by and for your comment. I found your blog and liked your music.
Yael
LikeLike
This is so cool! Thanks so much for sharing this tutorial — loved how the card turned out.
LikeLike
Hi nancy,
Thanks. Glad you liked it.
Yael
LikeLike
this is wonderful!!!!!! I love that you made a video tutorial too. Thank you for joining in the fun at the Thursday Favorite Things hop. Happy weekend wishes xo
LikeLike
Hi Katherine,
Thanks. Happy to share. Hope your readers have fun with this.
Yael
LikeLike
What a great idea…and tutorial! I can’t wait to try this with my tiny little violas. Oh..how pretty it would look.
Thank you for sharing this…I really appreciate it!
Blessings,
Carolynn
LikeLike
Carolynn,
Thanks. Your violas will look lovely with this. I have tried it a lot with violets and other small flowers. Works nicely with pine needles for Winter crafts. The example I used was lavender leaves, which makes a very nice smell.
Yael
LikeLike
This is a great tutorial…simple and clean looking. It reminded me of the ole school days of melting crayons in wax paper? Remember this?
Laurie
LikeLike
Laurie,
Thanks. No I don’t remember the melted crayons, but do remember layering black crayon on top of multi colors and then etching a picture.
Yael
LikeLike
Great tutorial! The parchment paper looks amazing! I do appreciate you sharing with Home and Garden Thursday,
Kathy
LikeLike
Hi Kathy,
Thanks for coming by and for your comment. I have always loved doing this for cards.
Yael
LikeLike
Wonderful post ~ love parchment paper ~ great tutorial ~ (A Creative Harbor) ^_^
LikeLike
Carol,
Thanks. This is so easy to do. Maximum time is about ten minutes to make the parchment and a little more time to make the cards.
Yael
LikeLike
Thanks for the wonderful inspiration! This will be beautiful with some fall colored leaves.
LikeLike
Cat,
Thanks for visiting. Yes, this would be nice with fall leaves.
Yael
LikeLike
Thank you for joining in the fun at the Thursday Favorite Things hop. Happy Monday wishes xo P.S. sorry I’m so late visiting 🙂
LikeLike
What a great tutorial! Who knew you could make your own? Thanks for sharing this with Share Your Cup.
Hugs,
Jann
LikeLike